

Have you ever wondered what you need to do to make your songs available on Instagram?
Or wondered why not all songs are available on the platform?
Instagram can be a helpful tool for promoting your music, connecting with fans, other musicians, like-minded people, and sharing your music. It started as an app dedicated to sharing pictures but soon expanded to include videos and reels as a response to the success of TikTok, the latest arrival in the arena of global social media platforms.
One of the features many users love about Instagram is adding music to your posts, reels, and stories. As an artist, this feature allows you to use Instagram to promote your music and other users to use the songs within Instagram’s music catalog; imagine how many people you could reach with your music playing on Instagram!
In this article, I’ll briefly explain how reels and stories on Instagram work and how to get your music featured on the platform for others to share it in their reels. I’ll explain how you can sync lyrics with your songs to create lyric videos on Instagram and discuss the benefit of getting your music on Instagram.
If you want to learn some creative ways to promote your music on Instagram, you’re in the right place.
What are Stories and Reels on Instagram?
Even though these two features might sound similar at first, reels and stories have different purposes. Let’s briefly analyze them to find their differences and learn when to use one or the other.
Instagram Stories
Stories are a post that only lasts for 24hrs after posting them. Stories can be previously edited on any video editor or can be a simple video message recorded from your mobile phone. You can share anything you like: a glimpse into your creative process while working on new material, a backstage scene while touring, or simply a good morning message from your kitchen to thank your fans.
Instagram Stories are great if you want to:
- Engage with your fans, ask them questions, create polls and quizzes, ask for donations, share new music, and start countdowns to your new releases or music videos.
- Link your Spotify, Apple Music, or YouTube Music profiles.
- Share links to your website, merch store, music video, or anything that can interest your fans.
- Allow your fans and followers to interact with your stories by reacting or sending you a DM. I know the more followers you have, the more difficult it gets to answer them, but this is how you can build a good relationship with them.
Instagram stories are great for releasing spoilers and updates on your new music because they’ll be deleted within a day. However, you can save some stories as highlights in your profile so people can see them even past the 24hr mark. It’s perfect for sharing tour dates, your merch catalog, or a Q&A so your fans can go back to it at any moment.
Instagram Reels
The first and foremost difference between reels and stories is that reels don’t disappear after 24hrs but stay on your profile in the reels section. Additionally, you can add a caption to your reels to ask questions and interact with your fans.
You can record reels directly from your phone or upload a previously edited video. You can leave the original audio or add music from Instagram’s music library when creating a reel. The reel editor lets you add a voice-over to create a video with background music and other visual effects. It’s like a mini and quick video editor within Instagram.
Some of the main features of reels are:
- Share longer videos with effects and music.
- Editing tools, speed controls, and effects.
- Engage with fans in the comment section.
- Reply to comments with a new reel.
- Save your reel drafts to edit and share later.
- Reach users who don’t follow you.
Your aim with reels is to reach an audience that is not following you. The more your Reel is shared, liked, and saved, the more chances it will be featured on the Explorer page. About 50% of Instagram users visit the Explorer page monthly to find new trends. Reels on the Explorer page differ for each user based on their liked content.
How to get your music on Instagram
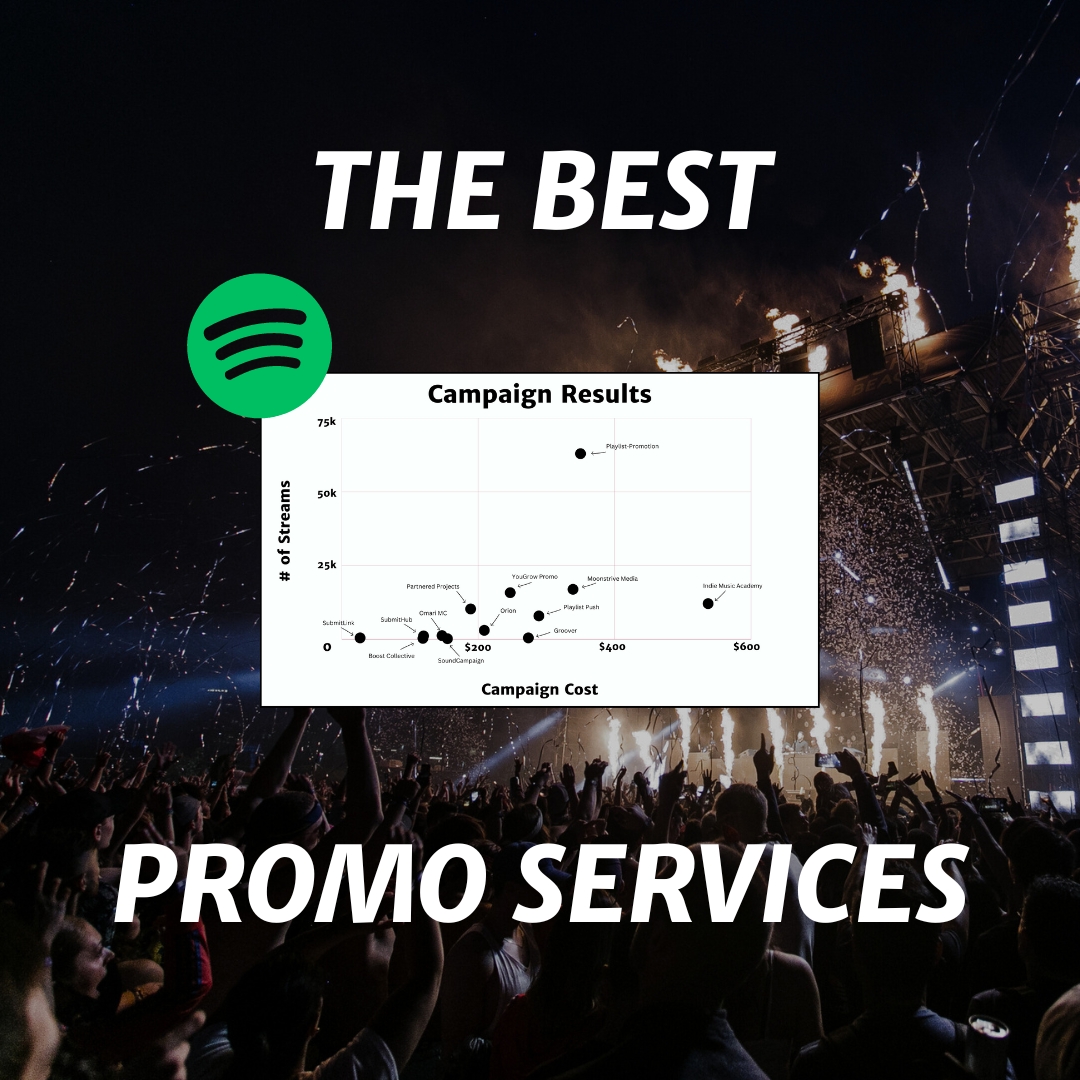
Instagram is a platform with billions of users who can become your fans if they hear your music on a story or Reel. That’s why many independent distributors and labels make Instagram distribution part of their services.
Here are the main steps to get your music released on Instagram. You may have additional or different actions depending on your distributor or label.
Step 1: Find a music distributor
You cannot upload your song to Instagram from your mobile phone or computer. You must release it first as you would on Spotify or another streaming platform. That’s why you need a music distributor before you do anything else.
What to look for in a music distributor:
- Price. You will find many options and price variations from one distributor to another. Some will ask you for a fee for each release, take a portion of your revenues, offer monthly subscriptions, or provide a free service with some limitations. Analyze and choose the right option depending on your needs. My advice? Go for Distrokid. There are many free options out there, but Distrokid is affordable, reliable, and gives you plenty of stats and customization options you’ll find extremely valuable in the long run.
- Find how much you keep from your royalties. Many distributors allow you to keep 100% royalties but will charge you a fee for their service.
- Verify that they distribute to Instagram and Facebook. Remember that Facebook owns Instagram, so if you don’t see Instagram but they say they distribute to Facebook, then most likely, your music will also end up on Instagram.
Some of the most popular companies distributing to Instagram are:
- DistroKid allows you to upload unlimited songs and albums for $22.99 per year to distribute your music to online stores and social media platforms, allowing you to keep 100% of your revenues. They claim to be the fastest distributor in getting your music into stores.
- As part of their FREE tier, TuneCore offers unlimited releases to social platforms, including TikTok and Instagram. Its subscription plan starts at $14.99 per year with unlimited releases on digital stores and 100% revenues.
- CD Baby has no subscription fees but uses a one-time fee per release of $9.99 for an album or single. You can choose to distribute to music stores and social media platforms, and they’ll keep 9% of your revenues.
- With Amuse, you get 12 releases per year for free, keeping 100% of your royalties and rights. However, you’ll need to upgrade your subscription starting at $24.99 per year to get unlimited releases and advanced features like Instagram releases.
These are just a few options to consider among many others out there. We’ve got a full list of top distributors here.
Step 2: Submit your music to your distributor.
Submit your new releases. Remember to add an art cover, lyrics, and other guidelines your distributor requires.
- Choose your destination platforms and music stores. Find and select Facebook and Instagram as release platforms.
- Some distributors may not have Instagram as a service, but activating Facebook monetization will make your music available on Instagram too.
- Wait for your music to be released and distributed. Be patient because your songs may take some time to be available for stories and reels on Instagram.
- Start sharing your stories and reels featuring your music.
Add lyrics to music on Instagram with Musixmatch
You could manually add your lyrics when creating stories, but there’s a platform that can automatically put your lyrics to your songs on all social media and streaming platforms, and they’ll be in sync with the music.
Musixmatch allows you to add or edit lyrics for your music, but you need to set up a few things before you can add and synchronize lyrics.
First, get verified on Musixmatch and wait. It might take some time, so be patient and plan accordingly to have your lyrics ready as soon as possible. Once you are verified, sign in to your account. Find the song you want to add lyrics to and select Add lyrics.
In the next screen, type your lyrics in the box and read the guidelines carefully. Here there are two main things to do:
- Listen to the track.
- Do not “copy paste” lyrics from another website.
And there are some guidelines to ensure your song lyrics are displayed correctly.
- Type all sections of a song even if they repeat.
- Focus on primary lyrics. Secondary lyrics must be in parenthesis.
- Do not add notes such as: intro, chorus, verse, bridge, or instrumental.
- Lyrics should be written in their native writing system.
- Break the lyrics into lines with the first letter of each line capitalized.
- Separate sections with double breaks.
- Capitalize proper names, places, and gods.
- Write numbers with words.
You can save the draft to continue editing later or submit the lyrics.
After sending the lyrics, you need to synchronize them from the Musixmatch mobile app. Open the app and find the song you want to synchronize. Select the platform where you want to synchronize the melody and lyrics and listen to the song. As you play the song, scroll the lyrics so they can sync with the music.
You’ll need to wait for your lyrics to update on Instagram’s music library. Verify its status by searching your song on Instagram stories.
Adding the lyrics to your music on Instagram can be a fun way to share snippets from your song and invite your fans to help you share your music with creative videos or pictures that describes how they feel about your song.
What are the benefits of getting your music on Instagram?
Great question.
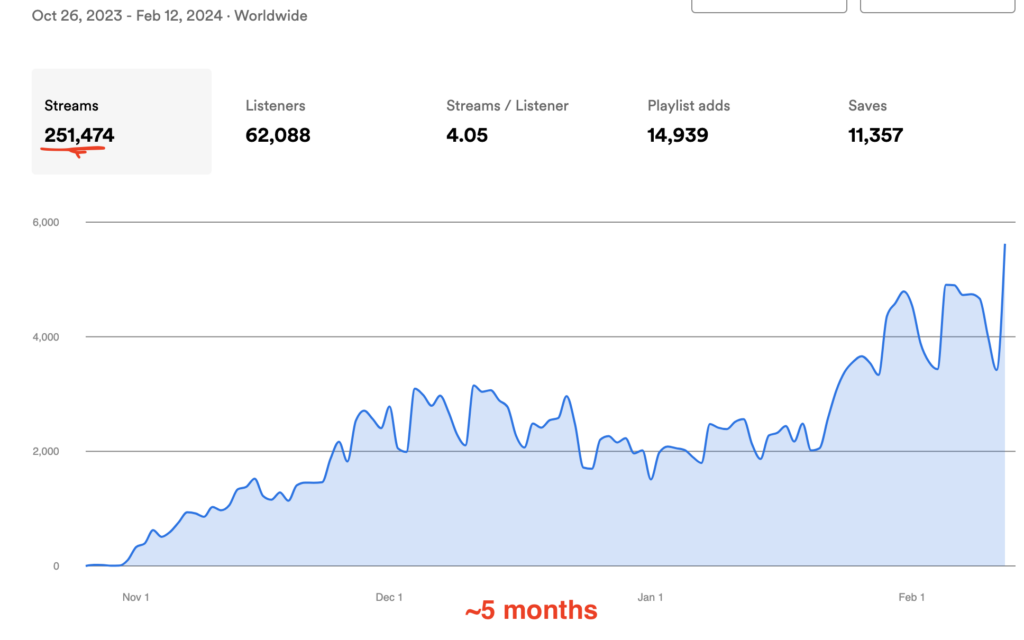
Releasing your music on Instagram’s music library will make it available to billions of users who can use it on their reels and stories. When a user uses your music from Instagram’s library, others can see the song and your name and start recognizing you.
Here’s a list of the main benefits of getting your music on Instagram:
- Your new releases and back catalog might go viral on Reels.
- Reach people who may like your music and then look for you on streaming platforms.
- Influencers who listen to your song and use it in their content can bring the attention of thousands of people. You can contact them and build a long-term relationship that could benefit both.
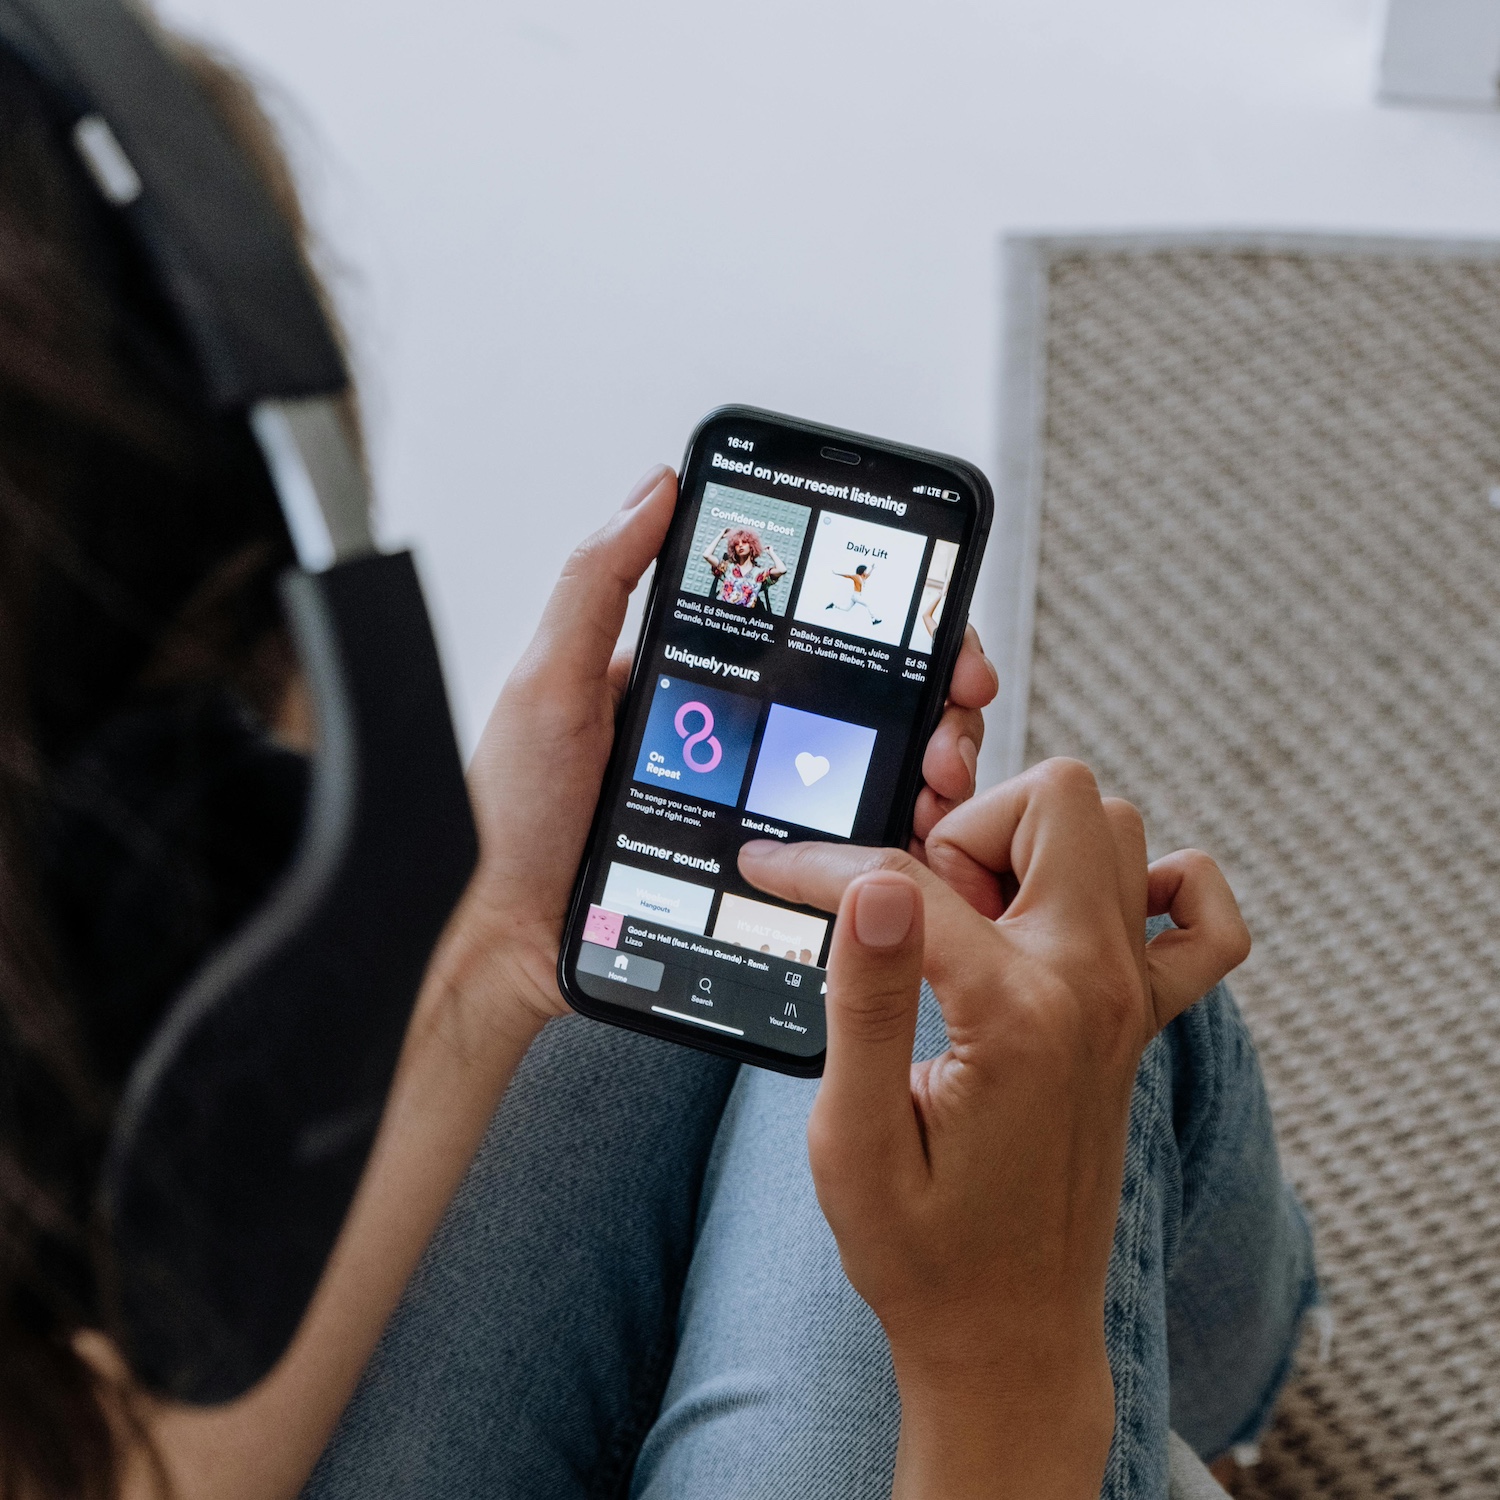
How to create Instagram Stories with your music
- Click the + button on the bottom of the app and open Instagram Stories.
- Record a video or upload one from your gallery. You can upload pictures too.
- Swipe up or select the sticker face on top and select Music.
- Search by artist, album, or song name.
- Choose the 15 seconds of the song you want to share.
- Select to display the album cover or lyrics. You can choose lyrics with different font styles and designs. Hit done when you finish styling your music sticker.
- You can move the cover and lyrics or make them larger or shorter.
- Post your story.
How to create a Reel with music
- Click the + button and select Reel.
- Tap the music icon and search for the song or artist.
- Select the section you want to use.
- Upload a video or record one and click add.
- You can edit effects and layouts and add stickers.
- Add final details and post your Reel.
Final thoughts on getting music onto Instagram
Instagram reels and stories are crucial tools to engage with your fans and expand your audience. There are endless ways to use these tools to promote your music: ask your followers to share a story or a reel about what your song makes them feel and to include your new single in it, or create a contest asking people to create a short video clip for your latest single or to sing along and dance to your song. With proper planning, you can bring to life an effective (and affordable) marketing strategy on Instagram that’ll skyrocket your career.
Good luck, and stay creative!